Wednesday, March 6, 2013

House before and ....during?

I feel like nothing is ever done in this house.... so I'm calling this one "Before and During."  We'll see if we ever truly get an "after" photo!

Front of house:


I'm still working on the landscaping, but otherwise I think this is pretty much done. We removed the giant Magnolia tree and changed pretty much all of the landscaping, painted the shutters and front door, replaced the roof, and of course a new front porch. I looooooove my front porch so so so much! I actually paid someone to build this for me, but painted/stained it myself.


Kitchen:

Possibly the biggest transformation for the least amount of money is the kitchen.  I've blogged about it a lot on here, so feel free to click around and learn how we did all of it! The ONLY thing professionally done was the granite.

But overall what we did was:  Remove the ceramic tile backsplash and countertops and had them replaced with granite, paint all of the cabinets black (a how-to is posted here), swap the location of the fridge and the dishwasher and of course replace all of the appliances, new light fixture, and paint over those horrid grapes! This room is D-O-N-E done!


Dining Room (or "Den" as I think the former owner used it for):


Boo ya!  Did this one shock you? I know, amazing, right? (Sorry for the dog toys and junk around - I snapped this one quickly!) The hubs and his BFF (he hates it when I call him that) took out the back door and the awkwardly placed window to put in the french doors. I painted, of course. We replaced the light fixture, as well.   (I made the table runner and the artwork on the walls that you can't really see here.)

To do in this room:
1. Crown molding
2. I may one day put in a proper chandelier, but hubs likes the fan in there so for now it stays.


Living Room:


What what?!!? Another shocker, I know! I'm sorry this isn't from the same angle. This photo was taken from a giant new hole in the wall!  When I took this pic, I was basically standing where the TV was in the other picture - that wall is now open to the dining room. (See the green tile on the floor in the first pic? That is behind the couch in this one.) The door you see adjacent from the front door in the photo is gone - we closed that up. (And of course paint, paint, paint, paint!)

To do for living room:
1. Crown molding


Guest/Hall bath:


I haven't really decided if I'm "done" with this room or not. Once I removed the horrid wallpaper, replaced the pink toilet, and toned down the rest of the pink with a polar opposite wall color - it became almost "cute" vintage rather than "puke" vintage.  Other than what was already said, I also replaced the light fixture and the mirror in this room and frosted the window (which looks out into the front yard and street!).

For sure to-do list for this room, with more perhaps coming later:
1. Paint the cabinet over the toilet white
2. Change the hardware on the vanity and give it a fresh coat of white paint


Master Bedroom:
 

This room is done. Nothing more to do here. :) Husband was set on having a RED bedroom. I had a red phase once, but I'm really over it now and am in my blue/green phase. I just couldn't bring myself to paint this room RED. So as a compromise, I painted the walls "mushroom bisque" and we got all red accents. It's a small room with a BIG bed, but it gets the job done!  Oh, and notice those two windows behind the bed? The one on the right is fake. It's not a window at all. I just hung blinds and curtains on the wall to make the bed look more centered in the room. Yes, I know - I'm a genius.

 
Master Bathroom:


Sorry for the fish eye, but it was the only way to get a small room in one picture. We completely gutted this room - there are a few blogs about it on this site if you want more info on how!  Not that you can see it, but the only thing left to do in this room is to maybe change out the light fixture. This is an older one that we already had, but it's a bit small for the space. Other than that, this room is DONE! It's stunning and we love, love, LOVE it.


So as you can see, some of the house is done - but a LOT of it isn't. We are going to start working on a list of things we want/need to do over the next year or two before we can sell the house. It's going to be a LONG one!


Master Bath Remodel, part 1

Remember THIS beauty?


Oh yes.... pink tile with more pink tile accented by teal sponge painted walls! It's a visual syrup of ipecac! It alllllll went into the dumpster - even the floor, which was rotten under that pink tile.


That photo is of my [then] step-dad helping out with the demo.... Phase one of the reno was done back in 2004. We gutted the puke pink bath and two adjoining closets to make it bigger. I won't say to make it "big" because it is still quite small, but it was teeny tiny before.  At the time the budget was TIGHT, so the finishes were cheap and quick - vinyl flooring, tile board on the walls, etc....  The intention was for those finishes to be temporary and to finish it off with higher end items later on. Here are some photos of phase 1:


That tub moved into the space that was two closets - one on the master bedroom side and one on the office/craft room side. They were so small they were practically useless, so I didn't worry about losing them. A tiny closet isn't much better than no closet, anyway. Like the vinyl floor and tileboard? Yuck!

Present day - we (my husband and I) basically gutted it again. Why? Because hubby didn't care for my garden tub (that we never used) and wanted a walk-in shower. With that change went some electrical changes, as well. And it just became easier to start all over again:


That's my handsome hubby! =)  I'm standing in the master bedroom taking this photo. Yup, that's right, we gutted BOTH sides of the wall. I mean, come on, while you're at it, might as well move the door and the outlets to a better place, too, right?  When you're making a mess, go BIG! 

The bathtub that I put in 8+ years ago went bye-bye.  My husband rarely has an opinion about house stuff, so when he felt really strongly about the tub going and a larger walk-in shower taking it's place, I went with it. (The tub sat out on our front lawn for awhile before I finally sold it on Craigslist. After all, it was a "Garden" tub! Get it? Garden? Front yard? See what I did there?)  I also sold the old vanity, linen cabinet, faucet, and about everything else in the bathroom on Craigslist. We decided to put in a double sink - so everything had to go!

Here is the shower pan going in. We hired this part to be done by a professional - because a bad shower pan will lead to leaks, mold, and all kinds of problems. We didn't want to risk making a mistake on that one, so this was money well spent. (My #1 tip to DIY'ers - know your limits and bring in a professional when necessary!) 


Hubby and I put up the drywall (ok, ok, HE did most of it!). He likes to make sure it is secure. (Holy screws, batman!)
 

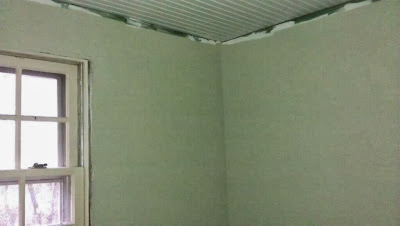
This is IN the bathroom (the green drywall is the mold resistant kind - specially made for wet spaces like bathrooms). 


 Like the beadboard on the ceiling? Yeah, we do too. Wait until you see it with the crown molding that goes up against it - it's going to be fab (wait for it) ulous!  #HIMYMaddict


This is the future home of our fantastic new shower:


Things have slowly been progressing.... one weekend at a time. It's been a VERY slow process because of our work schedules. 


I'm the painter in the family. This is "Ocean Foam" by Behr. (Crown, window trim, baseboards all still missing...)


The floor tile went in, and then it seemed like nothing happened for a few weeks (at least). The red is another water-proofing product called "red guard."  Hubby completely coated the cement board in the shower and on the floor with it. We don't EVER want to deal with a rotten sub floor again!


Then came the grouting, and the sealing of the grout. (Boring and a lot of hard work!)


Once the grout and sealer fully dried, we were able to start bringing in a few fixtures! (Did I mention I got this off Craigslist (brand new in box!) for a STEAL?!)


When we framed the walls, I measured where the vanities would go and nailed in some a 2x4s in the right spots - so we were able to screw these suckers right into studs so they'll never budge.


Oh yeah, $hit just got real!!! 

But as you can see from that red peeking around the corner, there still isn't any tile on the shower walls. We got all smart and put in TWO benches in the shower, thinking it was a fabulous idea (it was!) but that is making the tiling process a bit more difficult, so we're still working out the kinks of the plan before we put it into action. But I couldn't wait to SEE some results so I put in the vanity, faucets, and hung the mirrors anyway.  (Still no water or toilet!)

UPDATE:  The toilet went in last night! The water should be able to be turned on again tonight. Woot!!

This saga is obviously to be continued.


Proof I can make stuff

I just started this blog. You don't know me from Adam (who IS Adam, anyway?) so I figured I'd prove to you that I actually do know how to make stuff, so hopefully you will come back for future tutorials and blogs! So here are some things I've made that I happen to have photos of on my computer:

Tablet case:

Yarn wreath. Anyone want it? Doesn't look right in my home....


Not the dog, the collar! ;)


I also made the little blue bird, but I forgot to take a picture of him before I gave him away. 


I was on a fondant kick for awhile.... (and not that great at it!)


Recovered some chairs (and a matching ottoman).

Some little purses as Christmas gifts

Slipcovers freakin' suck. I vowed never to do it again! (But I did....)


Christmas Decorations!


Mailbox! (Love my Silhouette Cameo!)


More cameo love - wine glasses! (I also glittered the stems.)


One Christmas I made a bunch of tote bags....


So there you have it. I can make things. Go me. ;)

World, meet me.


Hi. I'm Gretchen.  I'm a 30-something gal with a sweet husband of 4 years now (married in 2010) and no kids. I suppose we'll have some rugrats at some point, but I'm still not feeling that "tick tock" so who knows. Anyway, I work at a desk all day long and stare at a computer. Blah. Since this blog is about my DIY life, let's talk about how I got there....

I graduated college in 2001 and took a little detour in life by moving to Boston, MA. LOVED IT! Great party town - but not "home" for me. Far too expensive to live there. I wanted to own a home and since I'll never be a millionaire, that wasn't possible there. So in late 2003 I moved to Nashville, Tennessee and in late 2004 I bought my first house. I didn't think I'd be there for more than 5 years, but then the housing market went crashing down and going on 10 years later I'm still there.  The house is basically nothing like it was when I bought it..... and in this blog you will learn why!

I'm also a crafty gal. I can't draw or paint to save my life, but I can sew! I also recently invested in a Silhouette Cameo and now I want to stick vinyl cutouts to EVERYTHING in the house! ;) I DIY'ed everything in my wedding (perhaps a blog about that at some point? Sure, why not!) and will always look into doing something myself before I'll hire someone else to do it. I learn as I go - and most of the time things turn out ok. I'm pretty good at finding creative solutions to problems - like with my epileptic dog and his many troubles before he passed away in 2010. (I know - random tangent here, but at some point I'll blog about that, too, and you'll see how it fits in!)

So thanks for joining me. I'll try to make this as interesting and informative as possible. I'm going to be doing a lot of back story to start with, and since I can't go back and take pictures now, I'll just do my best with what I have. Going forward, I'll try to document things much better for you all!

World, meet house.

I guess we should start from the beginning. In 2004 I bought THIS:

I know what you are thinking.... "That's not so bad."  Oh, but wait! Here are some photos from when I toured the house. Please note these are NOT my furnishings! This is when the previous owner lived there.

No, it's not 1985.... it's 2004. I promise! But I'm not sure anyone else in this house knew that:

How about a dining room? Or.... a den? What in the world IS this room?

Grapes anyone?

This still makes me laugh. Here is the "master" bedroom:

Think that's bad? How about the "master" bath attached to it? (Oh yes, it gets worse!)

Kid's room. Can't really make fun of this one..... I mean, come on, it's a kid's room!  That door lead to the jack-and-jill bathroom, also known as the "master" bathroom. That's right, the master bathroom had a door into the kid's room! (Sneak peak into the future - it's not there anymore!)

How about the guest room? This might have been one of the least ugly rooms in the house when I bought it. But how about that light fixture, folks?

I saw a lot of potential here. (This photo was taken after I took possession and had the house professional CLEANED!)


Guest/Hallway bath. I have no words for that pink toilet. None. (And I am rarely speechless!)

Now that you have a good feel of what the upstairs looked like, I shall break your heart in telling you that I do not have any "before" photos of the basement. I know, I know! SHAME on me! If I remember correctly, the homeowner was there and hanging out downstairs, so we felt weird about snapping away while he sat there watching television. Let me just promise you that it was WORSE than the upstairs. We'll meet aspects of that in future posts.... but let me paint you a mental picture:  Crayola green carpet with about 30 year of DIRT on it in half the basement, and some kind of garage floor coating on the other half. (The house originally had a small basement and a two car garage - genius former owner made it a one car garage with a larger basement and apparently decided not to update the flooring.) Concrete smeared on the walls for "texture." Barn doors for the laundry room (painted sage green like the outside shutters, might I add). Oh, it was bad! (Shutters!)

And now that you know "the house" I think we can safely move on with this DIY journey together....