We are working on downsizing and preparing to sell our house and move in the spring. So why am I making new furniture? Staging! One of our spare bedrooms (in the basement) is currently a
Inspiration:
This beauty from West Elm for only $299
My shopping list was short and easy since I already had most of what I needed.
Here is my Home Depot shopping list:
4 - 12" table legs, 4 - brackets, and a 3" thick piece of foam came to $52 and free shipping.
I also used a 12" x 36" by 3/4" board that was previously used as a shelf in my craft room (I took the shelves down so we can stage it as a kids room)
About a yard of fabric, vinyl, or leather (I have a massive fabric stash)
One button making kit (Like this). Usually around $3 - $4 in craft stores.
String or rope to make piping, if you want to use it (you'll need a sewing machine if you do)
Staples and a staple gun
A drill and around a 1/2" or larger bit (I used a 7/8" spade bit bc it's the first one I came to in the tool box)
A looooooong needle and some strong thread or string
Some craft adhesive (I used spray adhesive)
Quilters batting, about a yard
I would guess a thrifty shopper (with Joann's coupons!) could buy all supplies for around $120 or less. Hopefully you already have the tools.
I started by deciding where I wanted my tufts to be and drilling large holes in the back of my board. The larger the better because you're going to have to blindly poke a long needle through them later on.
Spade bits make a mess. Wear your safety goggles and go outside or in the garage!
Next I cut the foam about 1/2 inch larger on all sides than my board. An electric kitchen knife is by far the best way to cut foam.
I then used a spray adhesive to affix the foam to the board. This will just make sure it never shifts around when a crazy dog goes running and jumps up on it!
The next step for me involved the sewing machine. You don't have to know how to sew to do this project. You can just skip this part and wrap fabric with no sewing - but I wanted piping on mine, so I had to sew that first:
And then sew the piping to my cover:
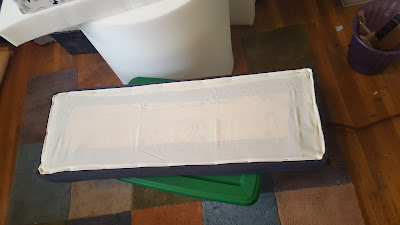
Then come the staples! First I highly recommend you wrap the foam and board in batting and put a few staples in that. The batting helps smooth the edges of the foam and will keep the fabric from rubbing the foam over time. You CAN skip this part, but I wouldn't. It just gives it an overall better shape.
Then wrap the fabric and pull it tight, stapling on the underside. I forgot to take a photo of this step, but you know how it goes!!
Then I lined the bottom of the board with the bottom strip of piping that I made and stapled that to the edges. Again, you can feel free to skip this step if you aren't into sewing or piping. After all that, here is what I had:
If you are doing piping, this is how I start and end mine:
And here is a closer look at the side with the piping on the bottom:
Next it's time to tuft. First I had to cover the buttons:

Then I measured out where the buttons go and marked them with pins
Next I used long upholstery needles and a thick quilting thread doubled over to attach the buttons.

To attach the thread in the back I just stapled it in and then bent it in the opposite direction a few times with more staples. Those suckers aren't going anywhere!
Before I put the staple gun away, I took some broadcloth and cut it about 1" larger on all sides than the bottom of the bench. Then I stapled it on to cover all of the ugliness
.
You can screw on the feet brackets right over the fabric:
Screw on the legs (which I previously stained), flip it over, and voila!!! (Don't mind the messy craft room!)
I can see where my seams were a bit off when I sewed the cover, but that's ok. Once it's in the room with everything else it's going tog look AH-MAZE-INGGG!!! I'll update this with a much better photo as soon as we get everything organized and staged in the new downstairs master bedroom. =)
I also recovered my upholstered headboard to match!


