Thursday, October 17, 2013

Boat rehab, part 1

As you saw in this post, we bought a project boat.  I'm not going to be able to really tell you anything about the mechanics part of the rehab, because that's my husband's job and I honestly don't know a thing about it! However, I can tell you about the "beautification" part, because that is MY department! 

I started with mold. A LOT of mold. 


We were told by the previous owners that the vinyl on the seats was only one year old, so at first I thought I would salvage it. I took all of the seats out and first sprayed them down with 50/50 bleach and water to kill the mold. Then I went at them with simple green. They came surprisingly clean:


But upon closer (cleaner) inspection, I found that the "new" vinyl was not done well at all. There was no sewing involved. They just folded some vinyl around the seats and put in a thousand staples. There were tons of folds where mold would continue to grow, and they just looked half-assed.  So off to Jo-Ann fabrics I went to buy vinyl!

But before I could even begin with that, I had to take apart the old seat covers:


They were SO GROSS!! The cushions were wet and stinky. I sprayed them down with Odoban (magic stuff!) and set them out in the sun to dry, which helped a lot.


Did I mention there were thousands of staples? And they were not proper marine staples - they were rusty staples! I had to remove ALL of them.


Once the cushions were dry and de-funked, I wrapped them in plastic (using some serious spray glue) to keep that from ever happening again. 

Then I was ready to hit the craft room! 


If you ever do a project like this, make sure you do your research before buying materials. I bought marine grade vinyl, and extra strong outdoor thread. (Never use nylon thread outside - the sun weakens it.) I also bought polyester rope to use inside my piping. Sure, the sun wouldn't have hit it had I used nylon rope, but I'm not taking any chances!

Step one was to make tons and tons and TONS of piping! I was a piping MACHINE!


Pile-o-piping!

Then I got started on the seat covers themselves. We decided to go with white, blue, and grey because those colors were already on the boat in places we hoped we would not have to re-do. That, and my husband did not want red because he was afraid it would someday fade to pink - so this is what we chose. We later decided we should name the boat R2D2!


Once the cushions were done, I had the issue of the horrible captain's chairs to deal with. These were NOT what came with this boat. These are cheap fishing boat seats. They had to go!  (I cleaned them up and sold the 4 on Craigslist for $100!)


Then I found these on Craigslist for free! They were from a 1970's boat, and they were ROUGH!


But they had the bones that I needed - and those bones were plastic! No wood to rot or metal to rust. I completely tore them apart and tossed everything except the bases and inner structure. 

I covered the bases with the same carpet that was to go on the bottom of the boat.  I cut new foam cushions (use an electric kitchen knife to cut foam!) and sewed all new covers for them. The end result:


Better, right?  Not perfect - and there are some things I'd do differently next time, but they'll get the job done!!  I really hated the idea of these back to back seats at first - until I realized they fold down into a bench. A bench that one can lay out on and catch some rays. YES! So I became a convert and I love them now.

Here they are in the boat - but more work still needs to be done!  (That is our friend's rear end! Haha! Let's not tell him his ass is on my blog, ok?)


That's it for now.  The boat is seaworthy, but my beautification projects are not yet complete. There are still the seat back pieces around the bow to cover, and new decals (a Silhouette Cameo project - yes!!!). She still needs a name, too! Any suggestions? 

Monday, October 14, 2013

How to Paint Cabinets


Although I didn't take many photos of the process, I'm going to tell you how I painted my kitchen cabinets. I do not guarantee anything about this method and if you decide to follow it, you are doing so at your own risk. I am not a professional and do not claim to be! I am simply telling you how I did mine almost 10 years ago, and they've held up very well!! :)  If in doubt at any point in this process, consult with a professional.

Before:

After:

Obviously I did more than just paint the cabinets, but we can talk about those in another blog. For now, let's get our materials and tools list together.

What you will need:
  1. Trisodium Phosphate, also known as TSP. This can usually be found in the paint section of your local hardware store. 
  2. Rubber gloves
  3. An electric hand sander with fine grit sandpaper
  4. Tack cloth
  5. A screwdriver
  6. An oil based primer
  7. Mineral spirits, to clean the oil based primer off your brushes
  8. A high quality paint - I recommend a semi-gloss or a gloss finish
  9. Paint brush
  10. Two small or "mini" foam rollers
  11. Painters tape and a pen or marker 
  12. Woodfiller - if you are replacing the hardware with some of a different size
  13. A face mask and protective glasses
Notice I did NOT put a "liquid deglosser" on this list?  No, I did not.You don't need it and I don't recommend it.

Step 1:
BEFORE you do anything else, go around the kitchen and label each door and drawer with their location. Although it might seem like you'll remember where they go, you won't.  I tore off two pieces of painter's tape and wrote the same number on each, then I stuck one to the inside of the cabinet and one to the door. Trust me, you'll thank me later.

Step 2:
Remove all of the doors and all of the hardware.

Step 3:
Clean! Here is where you use the TSP.  If your kitchen was anything like mine, it has years of grime on it. You need a hard core cleaner to get the years of grease and food splatter off. Follow the directions on the TSP container and make sure you wear gloves. Clean any surface that will be painted.

Step 4:
If you are replacing the hardware with some of a different size, you will want to fill the current holes with wood filler. Follow the instructions on the package. It's easy!

Step 5:
Sand! (Before starting this step, make sure you are not sanding off old lead paint. If you aren't sure - STOP! Go to the store and get a test kit! My cabinets were not previously painted, so I was good to go.)  Put on your mask and glasses, get out the electric hand sander, and go at 'em! I know some people say you can skip this step - but don't! And don't cheat by trying to use that liquid deglosser stuff. Nothing works like a true sanding! If you try to take the easy route here you will regret it later when your paint is chipping and peeling off. Get out the sander and get in some elbow grease! Sand until there is no longer any gloss on the surface. You do not have to sand ALL of the old paint or whatever off - just until the gloss is gone and the surface is nice and smooth.  Once you are done, clean off all of the dust very well with your tack cloth. They must be perfectly CLEAN before you can paint.

NOTE: Before going on to the priming step, here is a cheater if you plan to paint both the front and back of the doors:  Put a very small nail in the corner of each door on the back. When you prime and paint, do the back first and then flip it over. The door will sit up on those nails, allowing you to then paint the front. You will have 4 small nail holes on the back of your door when you are done, but no one will notice them. (If you think you WILL notice them and this will drive you crazy forever and ever, don't do this part. You'll have to take your time and allow one side to thoroughly dry before flipping it over to do the other side! I still recommend starting with the back, though.)

Step 6:
Prime.  I recommend using a high quality oil based primer. You can paint over an oil based primer with either an oil based or a latex based paint, but the oil based primer will create a stronger bond.

When priming, you don't need a thick, solid cover. Just one regular coat with a good quality foam roller is fine. Why foam?  Because it's smooth and won't leave any roller marks or fuzz on your cabinets! Use a brush where you have to, but do everything you can with a roller. You won't have to worry about brush marks this way.

Be sure you are working in a cool, well ventilated area. Do NOT work in the sun! The sun will make the paint dry too quickly and you'll end up with splotches.

I would toss the roller and use a fresh one on the paint. To clean your brush, use the mineral spirits or your cleaner of choice.

Step 7:
After your primer has dried the recommended amount of time listed on the package, it's time to paint! You will need at least two coats of a good latex paint. Depending on the color, you may want a third coat. Make sure you follow the directions on the can for dry time between coats.  Again, use the foam roller for as much as you can. Do NOT do any spot touch ups! If you missed a spot, you can not go back and just touch up that one spot. It will not look right. You must do another full coat over the entire surface. (TRUST ME ON THIS ONE!)

Step 8:
Wait. I know you want to hang them back up right now, but don't. Wait a few days for the paint to fully cure. I know it sucks, but unless you want to risk messing up your masterpiece, you've got to wait.

Step 9:
Rehang those beauties and enjoy!  Here is where you will thank me for numbering the doors. If you are drilling new holes for your hardware, consider making a template out of cardboard to help you ensure you get them all in the exact right place.

I hope this helped! I'd love to see some before and after photos of anyone who has tried this! I did mine in 2004 and they have held up beautifully! 

If you want to see more about my budget kitchen remodel, you can visit here.

Friday, October 11, 2013

Kitchen Re-remodel

This is where we are now: 


But let's start from the beginning, shall we?

THIS is where we started back in 2004 when I bought the house.

Harvest gold appliances, baby! I know you're jealous!  

If we could ZOOM in on that tile backsplash, you would see these beauties:

Uh huh, your eyes are not deceiving you. My kitchen backsplash had lobsters and hard boiled eggs on it! The OTHER accent tile had ka-bobs.  (I wish I was kidding!!) 

So..... step one was to rip those countertops and backsplash OUT! Buh-bye! Back in 2004 when I bought the house I was 25 and cash poor - so I put in laminate countertops and painted the drywall for the backsplash. 

Step two was to paint the cabinets. <-- click for a great step by step tutorial!

It was a big improvement, but it wasn't done.  (Oh, and I was into painting the ceilings the same color as the walls back then.... I'm over that now.)  I thought that green and black looked amazing back then.... now I look at it and cringe a little.


In 2012, I started getting real about round two.  Some close friends of mine had just remodeled their kitchen in order to sell their house - and were regretting that they had not done it sooner. They wished they had been able to enjoy the beautiful upgrades!

I knew I would have to replace my countertops before I could sell someday, mostly because the husband did this with the fish tank heater one day while cleaning the tank.  (BURN MARK!)

So one day while looking at Home Depot for glass accent tile for the master bath project, I came across this tile on clearance.  It was beautiful - and more importantly, CHEAP!  I forget what I paid for it now, but I think it was around $2 per square foot. It's not my "perfect" tile..... but the price was right, and I felt that it was neutral enough that future buyers would be ok with it. I was afraid if I chose MY perfect tile, someone else might not like it. And since this is not our "forever" house, this was a great choice.


Then, as you can see, I also started looking at laminate countertops. (That little sample chip next to the class tile in the picture above is a laminate countertop sample.) 

As I started looking into it, I found the prices of solid surface countertops really wasn't that bad. And surprisingly, granite was actually the most affordable of all of the various choices. I went to Home Depot just to get ideas, and found this - Crema Perla. With the current sale they were having, it was only $31.50 per square foot INSTALLED, with no sales tax (which is almost 10% in Tennessee!). Having already spoken to a few friends about what they spent and looking at an estimate a friend had just received for her kitchen, I knew this was an amazing price. I took the sample home to the hubs to make sure he liked it, and then we jumped on that deal!

We liked that it incorporated the black from the cabinets, with some brown tones from the backsplash tile, while also being lighter than the old black laminate ones.  It was the one I first gravitated towards on the display, and it just so happened to be the cheapest one in the store. SCORE!


So off came the old countertops. And get this - I sold those bad boys on Craigslist for $100! Instead of having to haul them to the dump and paying the dump fees, someone paid me to come pick them up. AND I got an extra hundey bucks to apply to the project. Win/Win!

Oh, and I tore off that stupid scalloped 1970's thing from above the window and replaced the raw lightbulb with a hanging fixture.  Like the shade?  It's a bamboo bowl that I cut a hole in the bottom of. Yes, I know it's not centered. That's a project for another day.


And the next day, the granite arrived. It was so beautiful - glistening in the sunlight! I immediately fell in love with it.


Here is granite-installer-extraordinaire drilling the holes for the (new) faucet. 


And here they are in all their glory!!  (Do you hear that "Awwwwwwwwwwwwwwwwwwwww!!!" angelic sound like I do right now? I know, right?!) But they looked like crap with the old green color, so I could not wait to get started on the backsplash!

OH!! And notice the new microwave shelf?  I had hubby build me a box to hold the microwave. We made it the same width as the current cabinet, which left a small space in the new cabinet. Hubby said "you'll never find a toaster oven to fit in that space!"  CHALLENGE ACCEPTED! And lookey there? It fits! (I've never met a shopping challenge I couldn't beat!)  Both are now UP and off my beautiful new counters - love love love!


I did the next part 100% myself. ALL OF IT.  Football season has started, so hubby is not much help these days. ;)

I started by putting in a bunch of nails into the drywall to make sure it was nice and tight against the wall.  You see, this kitchen is actually covered in thick, solid pine knotty wood boards. (Not paneling - SOLID wood circa 1964!) We put the drywall in front of the wood rather than trying to remove it (the cabinets were installed over top of it, so removing it would have been nearly impossible.) 

Then came the adhesive and the tile install. My back STILL aches from it all! It took two days to put it all up, and another two days to grout. Just like in the master bathroom project, the white unsanded grout shrunk when it dried and needed a second coat. It was tedious work, but well worth it!


I used mosaic glass tile cutters that I bought from Hobby Lobby to cut the tiles. They worked ok, but not perfectly. There are some slightly jagged cuts, but I knew I would cover those with caulk in the end, so it was ok.  They did NOT work to cut these skinny tiles lengthwise, and my internet research shows that that was nearly impossible to do no matter what you used - so I had to plan accordingly.
 
The below photo is before the grout, and shows how I chose to end the tile on the one side that did not end in a corner. I bought some "shoe molding" from Home Depot and covered the edges with it. I also added an extra little piece of half round at the very top, because the tile did not come all the way to the top of the drywall and I wasn't able to cut the tiles lengthwise. I painted it white, and voila!!  I also added the same shoe molding under the window, because again - I needed like 3/4 width of tile and couldn't cut it that way. It makes the window look more established and with a little caulk and paint, you can't tell it wasn't always like that.


Before the grout went in:


Grout, grout, and more grout!  I also used white silicone caulk for all of the places where the tile but up against a cabinet, and against the countertops.  I lined each edge with painters tape, caulked it, smoothed it with my finger, removed the painters tape, and then smoothed it again. This made sure I had nice, clean lines and did not get the caulk in places I did not want it.


Everything done - new outlet overs and new faucet, too. Next step - a floor upgrade and paint!


Oh, and I spray painted my knife block blue and labeled it using my Silhouette Cameo, just for fun. Isn't it cute?


Next steps?

1. Painting the grout on floor - DONE

2. Painting the walls - the perfect shade of gray is ever illusive! But I found it!


Girl vs.... boat?

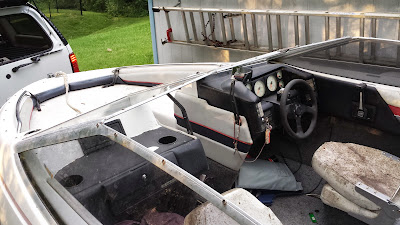
Yes, you read that correctly. We're rehabbing a boat!  We purchased an 18 foot Bayliner Capri for a whopping $300 and are determined to get her on the water again!

Here she is! Mark this post in the big time "BEFORE" column!


Master Bath Remodel, Part deux

If you've been following along with part 1 of the master bath remodel, you know that we're ready to tile the shower. When we bought our tile ($.69 a square foot, thank you very much!) we stupidly thought we could use the same 12x12 tiles on the floor of the shower that we did everywhere else. WRONG!  The floor of the shower is contoured so the water will drain properly, so you need small tiles there. Duh! We should have known this - big mistake on our part. So I had to track down some tile that matched our other tile, or at least close enough to make it work. Home Depot to the rescue!! But at almost $9 a square foot, it kind of blew the budget!


I became the tile master, laying tile like a mad woman! This went in fairly easily since the little tiles are in 12x12 sheets with mesh on the back. Hubs cut with the wet saw while I gopped on the mastic and set those babies in. Done in a day!

Next was the walls, which took WAY TOO LONG!  I wish I had taken more photos of this process, but really it's just sticking tiles to walls, so there isn't much to see.  After a long, long, LONG process, here she is!

Helloooooo beautiful!!

This is after the grout, too. Which also took too long. We used a light brown sanded grout for the porcelain tile, and a white unsanded grout for the accent tile. The unsanded white grout took two applications (which was highly disappointing!). 


Next we headed to Lowes to purchase the glass doors. We were lucky that a standard size door kit would fit in our opening, which made them not that expensive. We needed sliding doors since the room is so small, there really isn't room for a pivoting door (plus, they are cheaper!).  (I cannot say/write the word "pivot" without having Friends flashbacks!)


So in went the doors! We also put in the new brushed nickle fixtures.

And before you knew it (6 months later), she was done! (Sorry for the fish-eye - it's the only way I can get the small room in one shot!)