Oh yes.... pink tile with more pink tile accented by teal sponge painted walls! It's a visual syrup of ipecac! It alllllll went into the dumpster - even the floor, which was rotten under that pink tile.
That photo is of my [then] step-dad helping out with the demo.... Phase one of the reno was done back in 2004. We gutted the puke pink bath and two adjoining closets to make it bigger. I won't say to make it "big" because it is still quite small, but it was teeny tiny before. At the time the budget was TIGHT, so the finishes were cheap and quick - vinyl flooring, tile board on the walls, etc.... The intention was for those finishes to be temporary and to finish it off with higher end items later on. Here are some photos of phase 1:
That tub moved into the space that was two closets - one on the master bedroom side and one on the office/craft room side. They were so small they were practically useless, so I didn't worry about losing them. A tiny closet isn't much better than no closet, anyway. Like the vinyl floor and tileboard? Yuck!
Present day - we (my husband and I) basically gutted it again. Why? Because hubby didn't care for my garden tub (that we never used) and wanted a walk-in shower. With that change went some electrical changes, as well. And it just became easier to start all over again:
That's my handsome hubby! =) I'm standing in the master bedroom taking this photo. Yup, that's right, we gutted BOTH sides of the wall. I mean, come on, while you're at it, might as well move the door and the outlets to a better place, too, right? When you're making a mess, go BIG!
The bathtub that I put in 8+ years ago went bye-bye. My husband rarely has an opinion about house stuff, so when he felt really strongly about the tub going and a larger walk-in shower taking it's place, I went with it. (The tub sat out on our front lawn for awhile before I finally sold it on Craigslist. After all, it was a "Garden" tub! Get it? Garden? Front yard? See what I did there?) I also sold the old vanity, linen cabinet, faucet, and about everything else in the bathroom on Craigslist. We decided to put in a double sink - so everything had to go!
Here is the shower pan going in. We hired this part to be done by a professional - because a bad shower pan will lead to leaks, mold, and all kinds of problems. We didn't want to risk making a mistake on that one, so this was money well spent. (My #1 tip to DIY'ers - know your limits and bring in a professional when necessary!)
Hubby and I put up the drywall (ok, ok, HE did most of it!). He likes to make sure it is secure. (Holy screws, batman!)
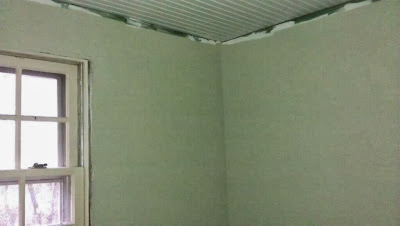
This is IN the bathroom (the green drywall is the mold resistant kind - specially made for wet spaces like bathrooms).
Like the beadboard on the ceiling? Yeah, we do too. Wait until you see it with the crown molding that goes up against it - it's going to be fab (wait for it) ulous! #HIMYMaddict
This is the future home of our fantastic new shower:
Things have slowly been progressing.... one weekend at a time. It's been a VERY slow process because of our work schedules.
I'm the painter in the family. This is "Ocean Foam" by Behr. (Crown, window trim, baseboards all still missing...)
The floor tile went in, and then it seemed like nothing happened for a few weeks (at least). The red is another water-proofing product called "red guard." Hubby completely coated the cement board in the shower and on the floor with it. We don't EVER want to deal with a rotten sub floor again!
Then came the grouting, and the sealing of the grout. (Boring and a lot of hard work!)
Once the grout and sealer fully dried, we were able to start bringing in a few fixtures! (Did I mention I got this off Craigslist (brand new in box!) for a STEAL?!)
When we framed the walls, I measured where the vanities would go and nailed in some a 2x4s in the right spots - so we were able to screw these suckers right into studs so they'll never budge.
Oh yeah, $hit just got real!!!
But as you can see from that red peeking around the corner, there still isn't any tile on the shower walls. We got all smart and put in TWO benches in the shower, thinking it was a fabulous idea (it was!) but that is making the tiling process a bit more difficult, so we're still working out the kinks of the plan before we put it into action. But I couldn't wait to SEE some results so I put in the vanity, faucets, and hung the mirrors anyway. (Still no water or toilet!)
UPDATE: The toilet went in last night! The water should be able to be turned on again tonight. Woot!!
This saga is obviously to be continued.


No comments:
Post a Comment